들어가며

이전 글에서 만든 서버에 접속하면 보안 안됨 경고가 뜨는데, 이는 http 연결을 사용하고 있기 때문이다. 이번 글에서는 Let's encrypt를 이용하여 https 연결을 구축하려고 한다.
Let's encrypt 인증서 설치
인증서 발급을 위해 certbot을 설치해야 한다. - [1]
$ sudo yum install epel-release
$ sudo yum install certbot
epel 저장소를 추가한 후 certbot을 설치해 준다.
* centOS9에서는 yum으로 certbot을 설치할 수 없다. 대신 snap을 이용할 수 있다. - [2]
* 여기서는 그냥 centOS8로 다운그레이드하고 새로 세팅했다.
와일드카드 인증을 위해 아래 명령어를 실행한다. - [3]
$ sudo certbot certonly --manual -d *.xivnick.me -d xivnick.me --preferred-challenges dns*.xivnick.me와 xivnick.me 도메인을 등록하는데, 소유 인증 방식은 dns를 이용하겠다는 뜻이다.
(와일드카드 인증을 위해서는 dns 추가만 가능한데, 이 경우에는 자동 갱신이 되지 않으니 주의한다.)
이메일을 입력하고 동의를 두 번 누르고 나면 아래와 같은 메시지가 뜬다.
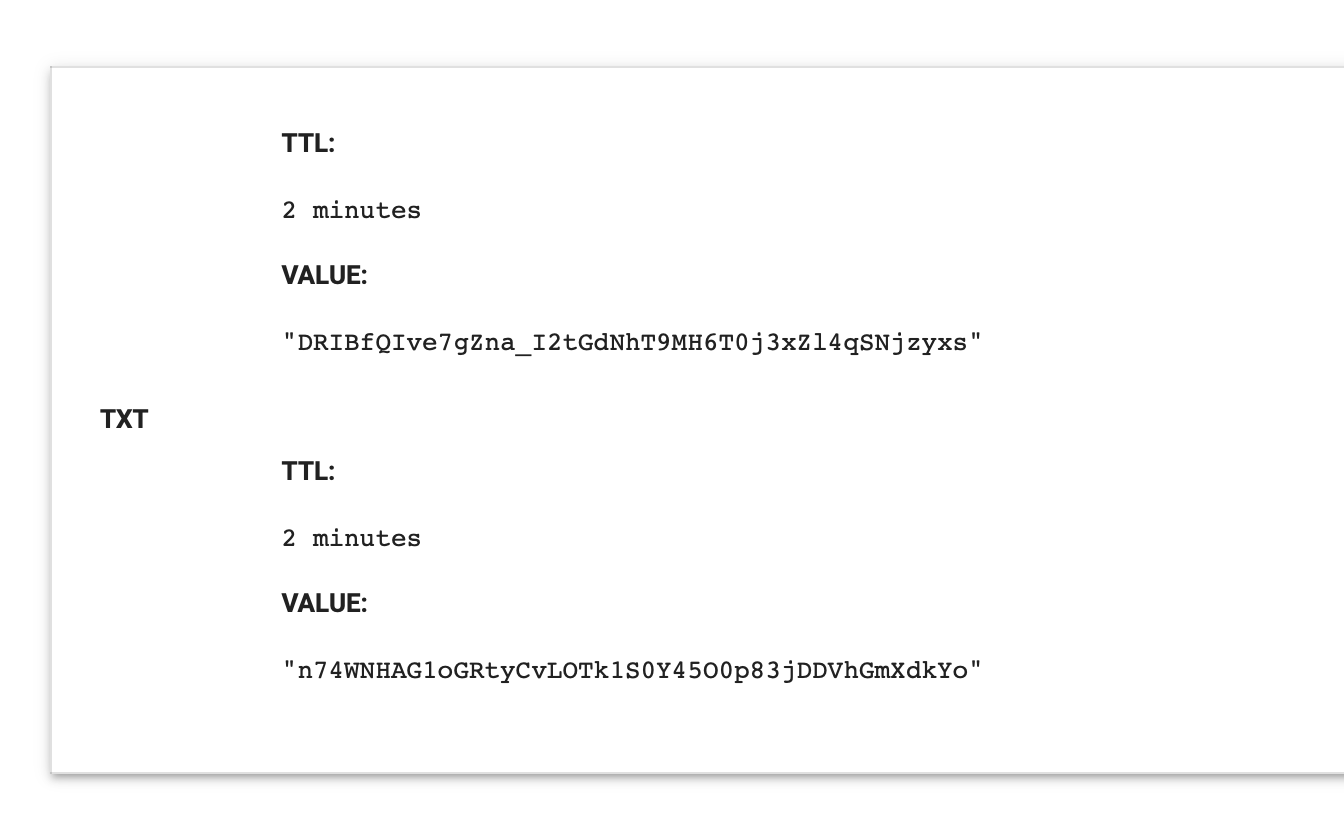
Please deploy a DNS TXT record under the name:

_acme-challenge.xivnick.me.

with the following value:

n74WNHAG1oGRtyCvLOTk1S0Y45O0p83jDDVhGmXdkYo
DNS 설정에서 _acme-challenge에 코드를 추가하여야 한다. Vultr로 연결해 두었으므로 Vultr에서 설정한다.
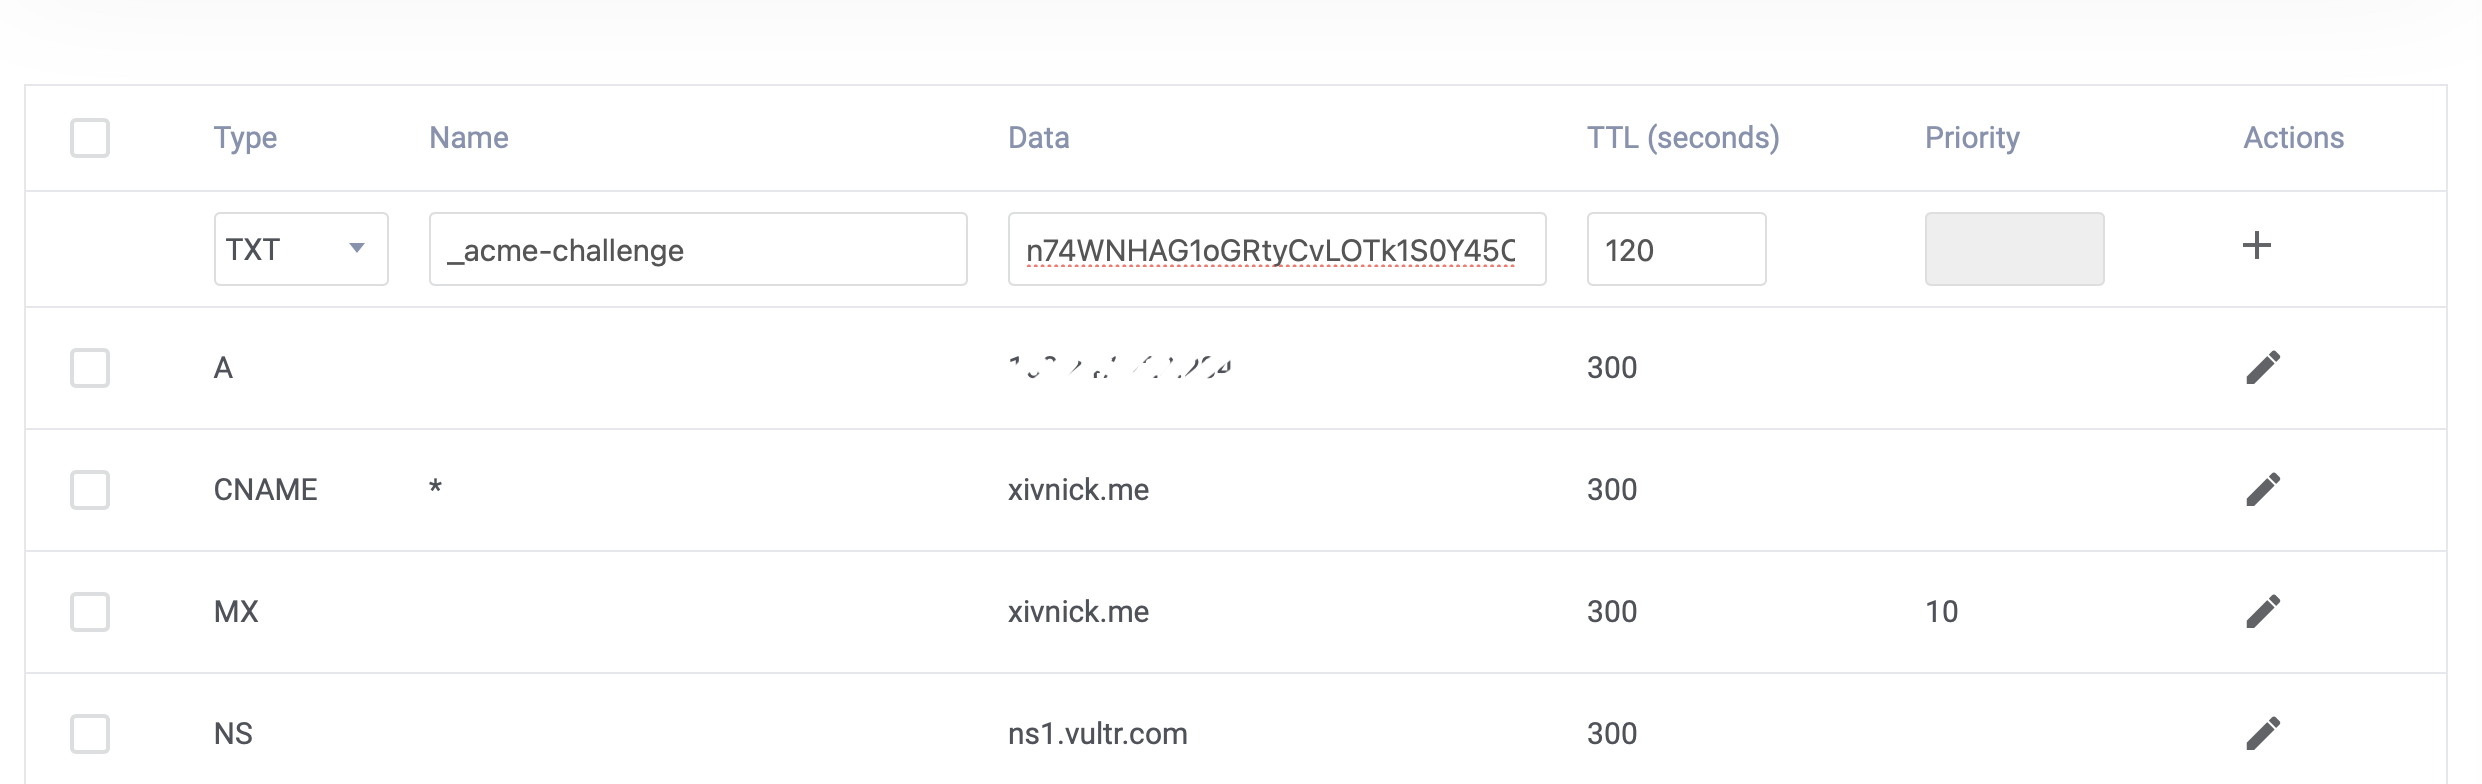
이때 하나 더 추가해야 하기 때문에 TTL을 짧게 설정하는 것이 좋다. 기본인 3600으로 설정하면 한 시간을 기다려야 갱신된다.
다시 콘솔에서 엔터를 한번 더 누르면 위 메시지가 한번 더 뜬다. 도메인을 두 개 추가하기 때문인 것 같다.
Please deploy a DNS TXT record under the name:

_acme-challenge.xivnick.me.

with the following value:

DRIBfQIve7gZna_I2tGdNhT9MH6T0j3xZl4qSNjzyxs

(This must be set up in addition to the previous challenges; do not remove,
replace, or undo the previous challenge tasks yet. Note that you might be
asked to create multiple distinct TXT records with the same name. This is
permitted by DNS standards.)

Before continuing, verify the TXT record has been deployed. Depending on the DNS
provider, this may take some time, from a few seconds to multiple minutes. You can
check if it has finished deploying with aid of online tools, such as the Google
Admin Toolbox: https://toolbox.googleapps.com/apps/dig/#TXT/_acme-challenge.xivnick.me.
Look for one or more bolded line(s) below the line ';ANSWER'. It should show the
value(s) you've just added.
추가한 후에 바로 엔터를 누르면 안 되고, 적힌 링크(https://toolbox.googleapps.com/apps/dig/)로 들어가 제대로 등록이 갱신되어 있는지 확인해야 한다.
두 개를 넣었기 때문에 두 개가 모두 나와야 정상이다. 하나만 뜬다면 설정한 TTL시간을 기다렸다가 다시 요청해본다.
Successfully received certificate.
Certificate is saved at: /etc/letsencrypt/live/xivnick.me/fullchain.pem
Key is saved at:         /etc/letsencrypt/live/xivnick.me/privkey.pem
This certificate expires on 2022-08-31.
These files will be updated when the certificate renews.
두 개가 뜬 것을 확인하고 엔터를 누르면 위와 같은 결과 화면이 나오게 된다.
Nginx 설정하기
nginx가 ssl 설정을 사용하고, http로 들어온 요청을 https로 리다이렉트 해주기 위해 설정을 변경해준다.
$ sudo vi /etc/nginx/sites-available/test.conf이전에 작성했던 test.conf를 열고 아래 내용으로 새로 작성한다.
server {
	listen 80;

	server_name test.xivnick.me;

	return 301 https://$host$request_uri;
}

server {
        listen 443 ssl;

        server_name test.xivnick.me;

	ssl_certificate /etc/letsencrypt/live/xivnick.me/fullchain.pem;
        ssl_certificate_key /etc/letsencrypt/live/xivnick.me/privkey.pem;

        location / {
                proxy_pass http://localhost:3000;
                proxy_set_header Host $host;
                proxy_set_header X-Real-IP $remote_addr;
                proxy_set_header X-Forwarded-For $proxy_add_x_forwarded_for;
                proxy_set_header X-Forwarded-Proto $scheme;
        }
}
80 포트로 들어온 요청은 https로 리다이렉트 하고, 443으로 들어온 요청은 아까 만들어진 pem key를 통해 인증한 후 nodejs 서버로 proxy pass 해준다.
$ sudo systemctl restart nginxnginx를 재시작해주면 test.xivnick.me로 접속했을 때 https로 연결된다!
인증서 갱신 준비
와일드카드를 위한 DNS인증의 경우 자동 갱신을 할 수 없다. (certbot이 DNS인증이 불가능하기 때문)
때문에 시기에 맞춰서 갱신을 해주어야 한다. certificates를 이용하면 인증 기간을 확인할 수 있다.
$ sudo certbot certificates
$ sudo certbot certonly --manual -d *.xivnick.me -d xivnick.me --preferred-challenges dns
인증 명령어를 다시 입력하면 갱신할 수 있다.
Saving debug log to /var/log/letsencrypt/letsencrypt.log
Certificate not yet due for renewal

You have an existing certificate that has exactly the same domains or certificate name you requested and isn't close to expiry.
(ref: /etc/letsencrypt/renewal/xivnick.me.conf)

What would you like to do?
- - - - - - - - - - - - - - - - - - - - - - - - - - - - - - - - - - - - - - - -
1: Keep the existing certificate for now
2: Renew & replace the certificate (may be subject to CA rate limits)
- - - - - - - - - - - - - - - - - - - - - - - - - - - - - - - - - - - - - - - -
Select the appropriate number [1-2] then [enter] (press 'c' to cancel):
지금은 위처럼 renewal 기간이 아니라고 하고, 2를 선택하면 갱신이 되는 것 같다.
Let's Encrypt는 3개월마다 갱신이 필요하니까, 시기를 잘 맞추도록 하자.
필요하다면 네이버 클라우드 플랫폼 등에 등록하여 알림을 받을 수 있다. - [4]
Reference
[1] https://jootc.com/p/201901062488
[2] https://www.linuxcapable.com/ko/how-to-install-apache-on-centos-9-stream/
[3] https://oasisfores.com/letsencrypt-wildcard-ssl-certificate/
[4] https://bboggi.com/entry/linux-CentOS-78에-무료SSL-인증서-Lets-encrypt-발급-및-설치
'내 서버 마련의 꿈' 카테고리의 다른 글
| [OSD] 5. Mysql 설치 및 연결 테스트 (0) | 2022.06.06 |
|---|---|
| [OSD] 3. 도메인 연결 및 nginx 서버 설정하기 (1) | 2022.06.02 |
| [OSD] 2. 테스트 프로젝트 - Node Hello World! (0) | 2022.06.01 |
| [OSD] 1. 서버 초기화 및 환경 설정 (0) | 2022.05.31 |
| [OSD] 0. 내 서버 마련의 꿈 - Own Server Dream (0) | 2022.05.31 |